Let’s face it, food nearly always appears nicer in pictures than it does in reality. Eating is a sensory experience. Our brain absorbs more information as we eat than just how the food appears. It also takes in flavors that are released from the dish. We quickly start to drool when we hear a grill sizzling or a spoon clink on a plate. The ultimate flavor is when everything comes together. Food consumption is an experience. In an effort to convey that feeling, a food photographer emphasizes the aesthetics of the dish. However, only a skilled food photographer can immortalize such priceless moments in each and every image. Continue reading the article to learn about food photography tips that will help you improve your images.
What is Food Photography?
Food is the primary topic of still photos in the genre of photography known as “food photography.” The pictures, which are a subset of commercial photography, are then utilized in cookbooks, billboards, marketing materials, and other things. Images are frequently utilized for websites, mailing banners, and social media profiles in the modern digital industry. Food may be a challenging subject since it cools, melts, or loses its luster rapidly. To help food photographers get the best shot timing, prop stylists, food stylists, lighting experts, and designers collaborate. We will help you understand different food photography ideas as the article continues.
5 Tips for Better Food Photography
These are some essential tips for food photography that will help you upscale and polish your photography skills:
1. Choose Your Angle
A lot of food images are taken from above. Although the above viewpoint is popular, it’s not the only one. It’s a good idea to take pictures of the meal from a perspective that is similar to what you would see while seated at a restaurant because chefs typically plan to plate from the diner’s perspective. Of course, you can also take many photos of each dish to determine which ones will look best.
2. Surround Your Object
Designing the space surrounding the meal itself is crucial to taking excellent food photos. A solitary thing in the midst of an empty dish is just as uninteresting as a plate in the middle of an empty table, which is frequently distractingly austere. To add a degree of artistic finesse to food, chefs frequently utilize garnishes, side dishes, sauces, and drizzles.
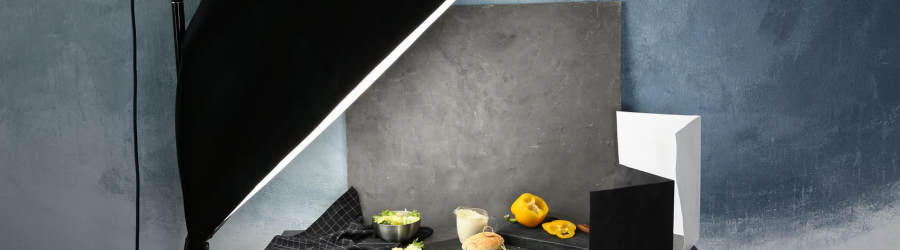
3. Use Fun Photography Props
A food photograph may truly be elevated with the use of props. Without any props, all you’ll have is a single plate of food on a table, which is neither aesthetically attractive nor adds any texture to the picture. Props may quickly transform your food photograph from amateur to professional. How do you begin? Here are some of the essential props we believe every professional or aspiring food photographer should have on hand in order to mix and match them to create the greatest set.
- 1-2 rustic, fun cutting boards: Photographers enjoy utilizing them to give the pictures more character, depth, and form. If you are utilizing white pottery and a white backdrop, they are also fantastic. They add contrast and help to break up the view a little.
- Vintage / non-shine cutlery, chopsticks, and unique knives and ramekins: These help you tell your story. The spectator can more easily see oneself preparing and consuming the food when there are cutlery and other enjoyable accessories present, in a professional’s experience.
- Backdrops: If you ask us, all you need is something dark, something rustic (like wood), and something light like white or grey. Most experts have a wide range of hues. Basically, you want to have a pretty well-balanced feed while you’re on Instagram. Therefore, to produce a visually beautiful feed, pick your colors and employ them in different combinations. The eyes are what people eat with first, so use color and balance to draw them in!
- Rustic, imperfect, grey ceramic bowls: These serve as a fantastic foundation, are adaptable, and don’t detract from the image. They are essentially used for the majority of sessions to establish consistency in your photography. You may start experimenting with other colors and forms once you feel more at ease. Never purchase porcelain dishes or plates/bowls with shine. You won’t be able to snap a nice shot with them, so make sure you only buy matte, polished, and used dishes.
- Plain matte white plates: Do we really need to elaborate on this further? Everyone needs traditional white plates, and as we mentioned, matte plates provide the finest photographs. You may get fantastic plates from stores like A Question of Eagles, Nom Living, FarmHouse Pottery, and Zamaa Ceramica to help you take the greatest pictures!
- Linens, newspapers & anything with texture: The hard part has already been discussed, but what about the soft parts in your photos? Here, texture and color are important, and by include\ing textiles in your photographs, you may give your viewers a feeling of location, time, and/or emotion. Use a checkered tablecloth to simulate a picnic, and a little soiled dish towel to indicate that the meal was prepared by hand in your own kitchen. Most like to keep their linens neutral, but it truly depends on the style you’re going for.
- Plants and flowers: Use plants and flowers in your shots to give them more vitality and a more natural feel. Plants and flowers not only smell wonderful while you’re shooting, but they also make stunning photo subjects. Additionally, this can assist you in learning how to fire other objects onto food.
- Little bottles, pouring glasses, mixers, etc: Different-sized bottles, pouring glasses, mixers, transparent glasses, and wine glasses with a light tint are excellent for providing activity, a sense of clarity, transparency, and honesty. Additionally, people are more likely to believe something if they can see it. For instance, if you see a picture of iced coffee next to one of the coffees, you’ll probably gravitate towards the iced coffee because it’s typically served in a transparent glass
with swirling milk and sweetener suction sounds. In a picture, it just appears more authentic than a cup of brown crap. Additionally, we enjoy adding hands to glasses-on photos. They may mix or pour for you, which truly gives your image a more realistic feel and appearance.
4. Create the Perfect Lighting
When you’re still learning photography, lighting may be a difficult beast to master. In order to give you an idea of what’s available, I’m going to break down some of the most popular lighting accessories and what they aid within your picture.
- Deflectors: With the use of deflectors, photographers may alter the harshness and softness of their light throughout a shot. Sharp shadow edges can be reduced, softened, or toned with deflectors.
- Diffusers: A diffuser, one of the most popular flash accessories, is a component that is made to attach to your camera’s flash. This makes it easier to get appropriate lighting, particularly in situations or locations where you might not have the time or means to properly perfect the lighting. A diffuser disperses the light and softens its harshness. Also known for making the lighting more attractive for your subject!
5. Use a Natural Background
One of my best pieces of advice is to think about taking pictures of your dish on an outside table in a natural location for a distinctive environmental perspective on food photography. Picnics, backyards, and courts make excellent locations for food photography because they create a fascinating mood and add to the narrative. Make use of a shorter depth of focus by using a wider aperture if your background is too distracting. Without getting bogged down in the specifics, viewers will still get a feel of the setting.
Conclusion
This may seem like a lot of advice to produce the finest food shots, but just like anything else, photography requires a lot of effort, experience, and experimentation. Don’t stop learning new tricks for enhancing your food photography. Take photos and don’t be afraid to experiment with the items you’re using or the lighting to create a fresh appearance. The above-mentioned food product photography tips will help you upscale your photographic career and help you make a name in this industry.